
I’ll start this post with a compliment to SAP:
SAP ECC license files are impossible to break.
(Unless you have some supercomputers at your disposal and a few years to dedicate on bruteforcing SSL private keys, that are probably expired before you can break them)
(Unless[2] you reverse engineer and patch the server binaries, but then you wouldn’t be breaking the license check but rather disabling it)
Beginning with its ECC6 product version, the licensing system used to control the products’ allowed usage and installations uses public-key cryptography with digitally signed files.
A digital signature is a mathematical scheme for demonstrating the authenticity of a digital message or document. A valid digital signature gives a recipient reason to believe that the message was created by a known sender, such that the sender cannot deny having sent the message (authentication and non-repudiation) and that the message was not altered in transit (integrity). Digital signatures are commonly used for software distribution, financial transactions, and in other cases where it is important to detect forgery or tampering.
This way, it’s practically impossible to create a fake license key, because only SAP has the private keys.
So you won’t see any keygens around unless someone manages to sneak the private keys from inside SAP.
This is an example license file, generated for a trial NetWeaver ABAP system:
----- Begin SAP License -----
SAPSYSTEM=NSP
HARDWARE-KEY=S0141382012
INSTNO=DEMOSYSTEM
BEGIN=20140922
EXPIRATION=20141222
LKEY=MIIBOwYJKoZIhvcNAQcCoIIBLDCCASgCAQExCzAJBgUrDgMCGgUAMAsGCSqGSIb3DQEHATGCAQcwggEDAgEBMFgwUjELMAkGA1UEBhMCREUxHDAaBgNVBAoTE215U0FQLmNvbSBXb3JrcGxhY2UxJTAjBgNVBAMTHG15U0FQLmNvbSBXb3JrcGxhY2UgQ0EgKGRzYSkCAgGhMAkGBSsOAwIaBQCgXTAYBgkqhkiG9w0BCQMxCwYJKoZIhvcNAQcBMBwGCSqGSIb3DQEJBTEPFw0xNDA5MjMxNjIwNTJaMCMGCSqGSIb3DQEJBDEWBBSRMtiAacWFK02IcR6F+swWQZjJLjAJBgcqhkjOOAQDBC8wLQIVAJULjsn8jIvGg0nHJ551TbYMZvwBAhRhpFgLT1lJuQV6ntftE693Ip8tIw==
SWPRODUCTNAME=NetWeaver_ADA
SWPRODUCTLIMIT=2147483647
SYSTEM-NR=000000000312339695
The LKEY field content is a base64 encoded and digitally signed text file containing some product license information:
NSPS0141382012NetWeaver_ADA 21474836472014092220141222DEMOSYSTEM
The digital signature is done with the PKCS#7 algorythm (the same used for S/MIME email messages).
The digital signer for the NSP licenses is identified as “SAP Trust Community”:
CN=NSP, OU=I0610000083, OU=SAP Web AS, O=SAP Trust Community, C=DE
(in this case “I0610000083” is the target installation number).
The signature verification used for the license files is done by the Application Server directly (not by ABAP code), and it uses a special PSE file named “LASVerify.pse”, that you can’t find in the server directories. It’s encrypted somewhere hidden and loaded into memory by the Application Server every time a license verification is performed.
For not being available in the server directories, it’s not possible to validate an SAP license file in ABAP without debugging the server binaries and extracting the PSE file. Therefore I’ll show you how to create your own certificate and sign a text file to be verified by ABAP code.
1 – Create a certificate
Using the instructions taken from the OpenSSL docs on certificates, we create a private/public key pair to sign our files.
The private key
Certificates are related to public key cryptography by containing a
public key. To be useful, there must be a corresponding private key
somewhere. With OpenSSL, public keys are easily derived from private
keys, so before you create a certificate or a certificate request, you
need to create a private key.
So we create a new private key:
$ openssl dsaparam -out dsaparam.pem 2048
Generating DSA parameters, 2048 bit long prime
This could take some time
...
openssl gendsa -out privkey.pem dsaparam.pem
Generating DSA key, 2048 bits
The public key
You can create a self-signed certificate if you don’t want to deal
with a certificate authority, or if you just want to create a test
certificate for yourself. This is similar to creating a certificate
request, but creates a certificate instead of a certificate request.
This is NOT the recommended way to create a CA certificate, see
https://www.openssl.org/docs/apps/ca.html.
$ openssl req -new -x509 -key privkey.pem -out cacert.pem -days 1095
You are about to be asked to enter information that will be incorporated
into your certificate request.
What you are about to enter is what is called a Distinguished Name or a DN.
There are quite a few fields but you can leave some blank
For some fields there will be a default value,
If you enter '.', the field will be left blank.
-----
Country Name (2 letter code) [AU]:BR
State or Province Name (full name) [Some-State]:Sao Paulo
Locality Name (eg, city) []:Sao Paulo
Organization Name (eg, company) [Internet Widgits Pty Ltd]:ABAP Ninja
Organizational Unit Name (eg, section) []:
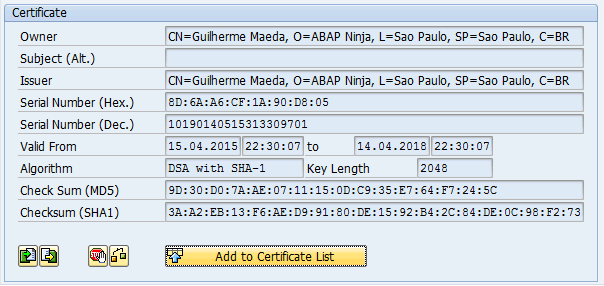
Common Name (e.g. server FQDN or YOUR name) []:Guilherme Maeda
Email Address []:
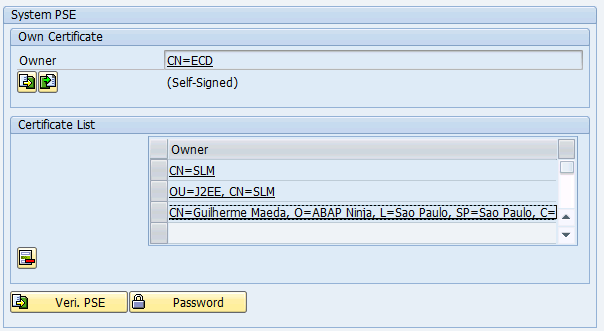
2 – Import the certificate into the SAP trusted store
In transaction STRUST, add the newly created certificate to the trusted certificate list:
- Open the System PSE profile
- Import the generated certificate (
Certificate -> Import) - Press
Add to Certificate List - Save
3 – Sign a file
Create a text file with some human readble contents in it:
Lorem ipsum dolor sit amet, consectetur adipiscing elit. Nunc sit amet lacus faucibus nisi mattis fermentum.
Nam ut ligula justo. Donec sed condimentum arcu. Quisque auctor in mi ac interdum.
Morbi sit amet nunc fermentum, congue nisl ac, hendrerit libero. Phasellus vitae tellus a lacus viverra aliquam.
Duis eleifend arcu ut bibendum facilisis. Donec porttitor in turpis in vestibulum.
Suspendisse tristique lacus nec metus semper ornare. Sed hendrerit varius libero, et efficitur nisl laoreet nec.
Sed velit orci, vehicula nec imperdiet at, hendrerit a est. Suspendisse potenti.
We can use the OpenSSL S/MIME tool to sign the license file in PKCS#7 format using our certificate.
$ openssl smime -sign -in data.txt -outform DER -binary -nodetach -out signed.bin \
         -signer cacert.pem -inkey privkey.pem
You’re going to get a binary signed file (signed.bin).
4 – Validate the signature in SAP
SSF Test Program
- In transaction
SE38, run reportSSF02 - Select the Verify function
- In the Input data parameter, select the signed.bin file
- Run, and press Verify
If you correctly added the certificate to STRUST, you should get a positive result with the signer information:
Results of the digital signature check:

         CN=Guilherme Maeda, O=ABAP Ninja, L=Sao Paulo, SP=Sao Paulo, C=BR
         SigningTime= Wed Apr 15 20:21:31 2015 (UTCTime: 150415232131Z)
         SSF_API_SIGNER_OR_RECIPIENT_OK
If you temper with the signed file, say, change something in the data section, the signature verification will fail.
Result:  SSF_API_SIGNER_ERRORS


Results of the digital signature check:

         CN=Guilherme Maeda, O=ABAP Ninja, L=Sao Paulo, SP=Sao Paulo, C=BR
         SigningTime= Wed Apr 15 20:21:31 2015 (UTCTime: 150415232131Z)
         SSF_API_SIGNER_OR_RECIPIENT_NOT_OK
ABAP Code
You can use the SSF_KRN_VERIFY function module to verify the signature. To do that, you must provide the path to a trusted certificates address book (.pse file).
In this example we use the system PSE (SAPSYS.pse).
report zverify_pkcs7_signature no standard page heading.

data: t_input_data type table of ssfbin,
      t_output_data type table of ssfbin,
      i_input_length type i,
      v_pab type ssfpab,
      t_signer_info type table of ssfinfo,
      v_error type string.

field-symbols: <signer_info> like line of t_signer_info,
               <output_data> like line of t_output_data.

"// Read the signed file
call function 'GUI_UPLOAD'
  exporting
    filename   = 'C:\Users\Administrator\Desktop\signed.bin'
    filetype   = 'BIN'
  importing
    filelength = i_input_length
  tables
    data_tab   = t_input_data.

"// Find the default address book file
data: t_parameter type table of parmvalues.
field-symbols: <parameter> like line of t_parameter.

append initial line to t_parameter assigning <parameter>.
<parameter>-param_name = 'DIR_INSTANCE'.
call function 'PFL_GET_PARAMETER_LOCAL'
  tables
    parameter_table = t_parameter.
call 'BUILD_DS_SPEC' id 'PATH'     field <parameter>-user_value
                     id 'FILENAME' field 'sec'
                     id 'OPSYS'    field sy-opsys
                     id 'RESULT'   field v_pab.
call 'BUILD_DS_SPEC' id 'PATH'     field v_pab
                     id 'FILENAME' field 'SAPSYS.pse'
                     id 'OPSYS'    field sy-opsys
                     id 'RESULT'   field v_pab.

"// Verify the signature
call function 'SSF_KRN_VERIFY'
  exporting
    ostr_signed_data_l = i_input_length
    str_pab            = v_pab
    str_pab_password   = ''
  tables
    ostr_signed_data   = t_input_data
    signer_result_list = t_signer_info
    ostr_output_data   = t_output_data.
if t_signer_info[] is initial.
  write / 'Signature verification failed' color col_negative.
endif.

write: /, / 'Signer info:'.
loop at t_signer_info assigning <signer_info>.
  write: / 'ID:', <signer_info>-id,
         / 'Profile:', <signer_info>-profile,
         / 'Result:', <signer_info>-result.
  if <signer_info>-result = 0.
    write / 'Signature is valid' color col_positive.
  else.
    write / 'Signature is invalid' color col_negative.
  endif.
endloop.

write: /, / 'Output data:'.
data: o_conv type ref to cl_abap_conv_in_ce,
      v_line type string.
o_conv = cl_abap_conv_in_ce=>create( ).
loop at t_output_data assigning <output_data>.
  o_conv->convert(
    exporting input = <output_data>-bindata
    importing data = v_line
  ).
  write / v_line.
endloop.
That’s it. Now you know how to the license files are created and validated.